ActiveLogin.Authentication.BankId
ActiveLogin.Authentication enables an application to support Swedish BankID (svenskt BankID) authentication, signing, payments, phone authentication, phone signing and digital ID card verification in .NET.
The most common scenario is to use Active Login for BankID auth/login, so most of the concepts will be described from that perspective. We've designed the other features to follow the same patterns and make sure we can share things like certificate handling etc.
Table of contents
- Getting started
- Environments
- Sign
- Payment
- Basic configuration samples
- Concepts
- Storing certificates in Azure
- Claims Issuing
- Return URL for cancellation
- Handle missing or invalid state cookie
- Multi tenant scenario
- Customize the UI
- Simulate BankID API errors
- Event listeners
- Store data on auth completion
- Resolve the end user ip
- Resolve the end user device data (app or web)
- Resolve requirements on Auth request
- Resolve user data on Auth request
- Custom QR code generation
- Custom browser detection and launch info
- Risk indication
- Verify digital ID card
- Use api wrapper only
- Localization
- Names of the person might be capitalized
- Cookies issued
- Browser support
Getting started
1. Preparation
Certificates
BankID requires you to use a client certificate and trust a specific root CA-certificate.
Read through the BankID Relying Party Guidelines. This ensures you have a basic understanding of the terminology as well as how the flow and security works.
For test: We have (with the permission from BankID) embedded the SSL certificate (FPTestcert5_20240610.p12) in the library. For production: Contact a reseller to get your very own client certificate for production. This will probably take a few business days to get sorted. Please ask for "Direktupphandlad BankID" as they otherwise might refer you to a broker/partner. If you haven't decided on using BankID, but want to try it out anyway there are test- and simulation possibilities. See Environments below.
The root CA-certificates specified in BankID Relying Party Guidelines (#7 for Production and #8 for Test environment) needs to be trusted at the computer where the app will run. We have (with the permission from BankID) embedded these in the library for easy verification.
2. Read the documentation
It is expected that you have a basic understanding of how ASP.NET, ASP.NET MVC and ASP.NET Authentication works before getting started.
Active Login is designed to make it very easy to get started with BankID, but in the end you are responsible for making sure that you are compliant with the technical guidelines and/or legal agreements.
Therefore, before you start using Active Login, please read the documentation relevant to your needs. This will also make sure you understand the concepts better.
3. Install the NuGet package
ActiveLogin.Authentication is distributed as packages on NuGet, install using the tool of your choice, for example dotnet cli.
dotnet add package ActiveLogin.Authentication.BankId.AspNetCore
3. Prepare your project
The authentication modules for BankID is registered in your Program.cs. Depending on your setup, you will probably have to configure challenge and callbacks in AccountController.cs or similar.
For the UI to work, it expects there to be a _Layout.cshtml available so that it can render within at @RenderBody().
The BankID packages have UI is not dependent on any UI library, but the samples uses Bootstrap, please make sure these styles are available in the _Layout.cshtml.
Our Samples might give you an inspiration on how to do all these.
4. Get started in development
BankID requires you to sign an agreement and receive a certificate used to identify you as a company. To get started and try it out the experience there is a simulated environment options available that uses an in-memory implementation. Great for development and testing.
services
    .AddBankId(bankId =>
    {
        bankId
            .AddDebugEventListener()
            .UseSimulatedEnvironment();
    });

services
    .AddAuthentication()
    .AddBankIdAuth(bankId =>
    {
        bankId
            .AddSameDevice();
    });
5. Use test or production environments
To authenticate using a real BankID you need to receive the certificate. See details under Preparation above.
Samples on how to use them in production are:
services
    .AddBankId(bankId =>
    {
        bankId
            .AddApplicationInsightsEventListener(options =>
            {
                options.LogUserPersonalIdentityNumberHints = true;
            })
            .UseProductionEnvironment()
            .UseClientCertificateFromAzureKeyVault(configuration.GetSection("ActiveLogin:BankId:ClientCertificate"))
            .AddSameDevice()
            .AddOtherDevice()
            .UseQrCoderQrCodeGenerator()
            .UseUaParserDeviceDetection();
    });

services
    .AddAuthentication()
    .AddBankIdAuth(bankId =>
    {
        bankId
            .UseProductionEnvironment();
    });
Note: .AddApplicationInsightsEventListener() requires the ActiveLogin.Authentication.BankId.AzureMonitor package.
Note: .UseQrCoderQrCodeGenerator() requires the ActiveLogin.Authentication.BankId.QRCoder package.
Note: .UseUaParserDeviceDetection() requires the ActiveLogin.Authentication.BankId.UAParser package.
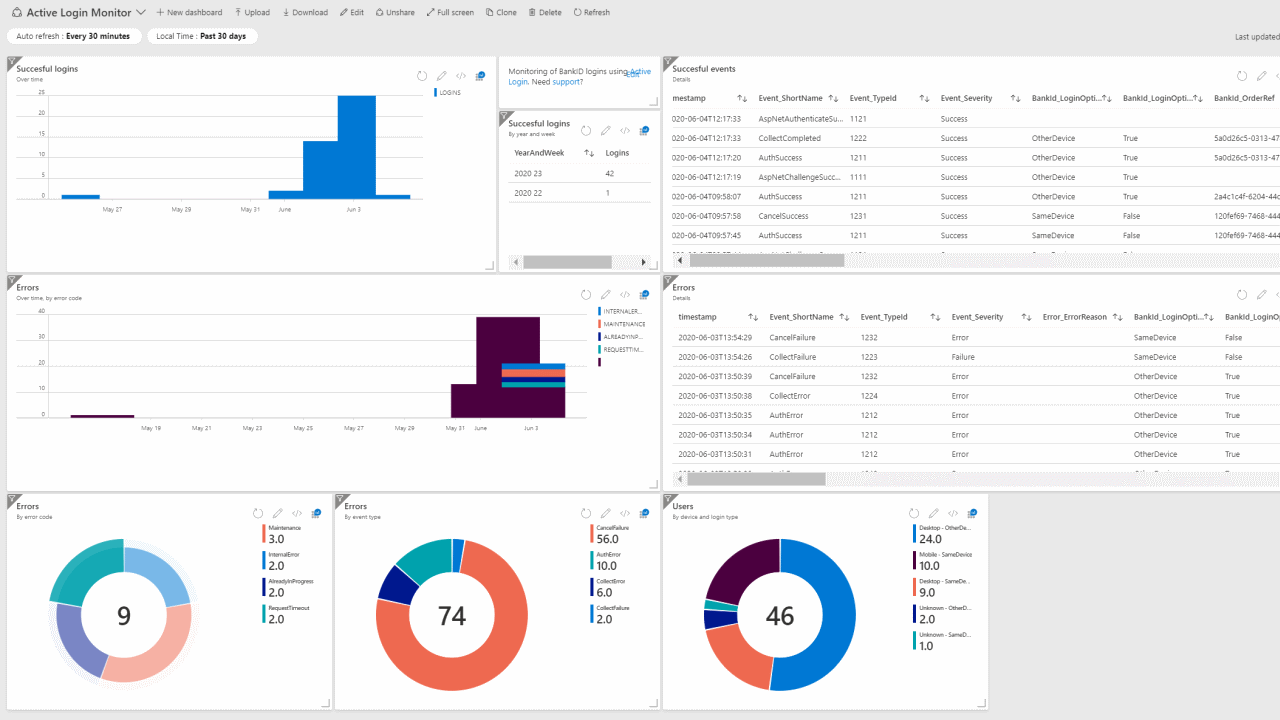
6. Monitoring
Active Login provides a structured way of generating and logging events. These could be monitored to get statistics and health status of your BankID login method.
Read more on the topic in Active Login Monitor.
Environments
Simulated environment
For trying out quickly (without the need of certificates) you can use an in-memory implementation of the API by using .UseSimulatedEnvironment(). This could also be good when writing tests.
Simulated environment with no config
services
    .AddBankId(bankId =>
    {
        bankId.UseSimulatedEnvironment();
    });
Simulated environment with custom person info
The faked name and personal identity number can also be customized like this.
services
    .AddBankId(bankId =>
    {
        bankId.UseSimulatedEnvironment("Alice", "Smith", "199908072391")
    });
Test environment
This will use the real REST API for BankID, connecting to the Test environment.
It will automatically register both the root and client certificate, even though this behaviour can be disabled. A scenario might be that you want to use the same flow for both test and prod and therefore make sure that fetching the certificate from KeyVault works by trying that out for test. It could also be useful if you are running an older version of Active Login which contains an expired version of the test certificate. You can then disable using the embedded, expired certificate and provide the valid test certificate yourself.
services
    .AddBankId(bankId =>
    {
        bankId.UseTestEnvironment();
    });
Disable adding the certificates
services
    .AddBankId(bankId =>
    {
        bankId.UseTestEnvironment(useBankIdRootCertificate: false, useBankIdClientCertificate: false);
    });
Specify client certificate format
BankId provides the client certificate for the test environment in three different versions FPTestcert5_20240610.p12, FPTestcert5_20240610.pem and FPTestcert5_20240610-legacy.pfx. Use FPTestcert5_20240610.p12 for newer applications and environments that support modern encryption methods. Use FPTestcert5_20240610.pem if your application requires PEM format. Use FPTestcert5_20240610-legacy.pfx for older applications requiring older algorithms such as Windows Server earlier versions than 2022. The format of the client certificate can be configured. By default FPTestcert5_20240610-legacy.p12 is used.
services
    .AddBankId(bankId =>
    {
        bankId.UseTestEnvironment(clientCertificateFormat: TestCertificateFormat.P12);
    });
Override default X509KeyStorageFlags
By default, X509KeyStorageFlags.DefaultKeySet is used when loading the embedded client certificate for the test environment.
If this default does not work in your environment, it is possible to override the X509KeyStorageFlags used when loading the certificate. This allows you to configure certificate handling in a way that is compatible with your specific hosting or security requirements.
services
    .AddBankId(bankId =>
    {
        bankId.UseTestEnvironment(
            keyStorageFlags: X509KeyStorageFlags.MachineKeySet | X509KeyStorageFlags.Exportable
        );
    });
Production environment
This will use the real REST API for BankID, connecting to the Production environment. It requires you to have the client certificates described under Preparation above.
services
    .AddBankId(bankId =>
    {
        bankId.UseProductionEnvironment();
    });
Disable adding the root certificates:
services
    .AddBankId(bankId =>
    {
        bankId.UseProductionEnvironment(useBankIdRootCertificate: false);
    });
Full sample for production
Finally, a full sample on how to use BankID in production with client certificate from Azure KeyVault and trusting a custom root certificate.
services
    .AddBankId(bankId =>
    {
        .UseProductionEnvironment()
        .UseClientCertificateFromAzureKeyVault(configuration.GetSection("ActiveLogin:BankId:ClientCertificate"))
        .UseQrCoderQrCodeGenerator()
        .UseUaParserDeviceDetection();
    });

services
    .AddAuthentication()
    .AddBankIdAuth(bankId =>
    {
        bankId
            .AddSameDevice()
            .AddOtherDevice();
    });
Sign
Sign works very similar to auth, but can't utilize the "built in" support for schemes etc. So there are some differences.
At first, you need to register both the common BankID logic (environment, cert etc) as well as the sign specific configuration (devices).
// Add Active Login - BankID
services
    .AddBankId(bankId =>
    {
        bankId.AddDebugEventListener();
        bankId.UseQrCoderQrCodeGenerator();
        bankId.UseUaParserDeviceDetection();
        bankId.UseSimulatedEnvironment();
    });

// Add Active Login - Sign
services
    .AddBankIdSign(bankId =>
    {
        bankId.AddSameDevice(BankIdSignDefaults.SameDeviceConfigKey, "BankID (SameDevice)", options => { });
        bankId.AddOtherDevice(BankIdSignDefaults.OtherDeviceConfigKey, "BankID (OtherDevice)", options => { });
    });
Once that is done you will be able to use these services in your application, for example in your controller:
IBankIdSignConfigurationProvider: List the registered configurations (SameDevice / Other Device)IBankIdSignService: Initiate and resolve the result of sign flow
Here is a minimal sample. See Standalone.MvcSample for more details.
[AllowAnonymous]
public class SignController : Controller
{
    private readonly IBankIdSignConfigurationProvider _bankIdSignConfigurationProvider;
    private readonly IBankIdSignService _bankIdSignService;

    public SignController(IBankIdSignConfigurationProvider bankIdSignConfigurationProvider, IBankIdSignService bankIdSignService)
    {
        _bankIdSignConfigurationProvider = bankIdSignConfigurationProvider;
        _bankIdSignService = bankIdSignService;
    }

    public async Task<IActionResult> Index()
    {
        var configurations = await _bankIdSignConfigurationProvider.GetAllConfigurationsAsync();
        var providers = configurations
            .Where(x => x.DisplayName != null)
            .Select(x => new ExternalProvider(x.DisplayName ?? x.Key, x.Key));
        var viewModel = new BankIdViewModel(providers, "~/");

        return View(viewModel);
    }

    public IActionResult Sign(string provider)
    {
        var props = new BankIdSignProperties("The info displayed for the user") // The user visible data
        {
            UserNonVisibleData = new byte[1024], // Whatever data you want to sign
            UserVisibleDataFormat = BankIdUserVisibleDataFormats.SimpleMarkdownV1, // The format of the user visible data, use empty or the markdown constant
            Items =
            {
                {"returnUrl", "~/"},
                {"scheme", provider}
            }

            RequirePinCode = true,
            RequireMrtd = true
            RequiredPersonalIdentityNumber = new PersonalIdentityNumber(1999, 8, 7, 239, 1)
        };
        var returnPath = $"{Url.Action(nameof(Callback))}?provider={provider}";
        return this.BankIdInitiateSign(props, returnPath, provider);
    }

    [HttpPost]
    public async Task<IActionResult> Callback(string provider)
    {
        var result = await _bankIdSignService.GetSignResultAsync(provider);
        if (result?.Succeeded != true)
        {
            throw new Exception("Sign error");
        }

        // Parse these to store the signed values
        var ocspResponse = result.BankIdCompletionData?.OcspResponse;
        var signature = result.BankIdCompletionData?.Signature;

        return Redirect(result.Properties?.Items["returnUrl"] ?? "~/");
    }
}
Payment
Payment works very similar to sign and auth. You need to register both the common BankID logic (environment, cert etc) as well as the payment specific configration (devices).
// Add Active Login - BankID
services
    .AddBankId(bankId =>
    {
        bankId.AddDebugEventListener();
        bankId.UseQrCoderQrCodeGenerator();
        bankId.UseUaParserDeviceDetection();
        bankId.UseSimulatedEnvironment();
    });

// Add Active Login - Payment
services.AddBankIdPayment(bankId =>
{
    bankId.AddSameDevice(BankIdPaymentDefaults.SameDeviceConfigKey, "BankID (SameDevice)", options => { });
    bankId.AddOtherDevice(BankIdPaymentDefaults.OtherDeviceConfigKey, "BankID (OtherDevice)", options => { });
});
Once that is done you will be able to use these services in your application, for example in your controller:
IBankIdPaymentConfigurationProvider: List the registered configurations (Same Device / Other Device)IBankIdPaymentService: Initiate and resolve the result of payment flow
Here is a minimal sample. See Standalone.MvcSample for more details.
[AllowAnonymous]
public class PaymentController : Controller
{
    private readonly IBankIdPaymentConfigurationProvider _bankIdPaymentConfigurationProvider;
    private readonly IBankIdPaymentService _bankIdPaymentService;

    public PaymentController(IBankIdPaymentConfigurationProvider bankIdPaymentConfigurationProvider, IBankIdPaymentService bankIdPaymentService)
    {
        _bankIdPaymentConfigurationProvider = bankIdPaymentConfigurationProvider;
        _bankIdPaymentService = bankIdPaymentService;
    }

    public async Task<IActionResult> Index()
    {
        var configurations = await _bankIdPaymentConfigurationProvider.GetAllConfigurationsAsync();
        var providers = configurations
            .Where(x => x.DisplayName != null)
            .Select(x => new ExternalProvider(x.DisplayName ?? x.Key, x.Key));
        var viewModel = new BankIdViewModel(providers, $"{Url.Action(nameof(Index))}");

        return View(viewModel);
    }

    [AllowAnonymous]
    [HttpPost("Payment")]
    public IActionResult Payment([FromQuery] string provider, [FromForm] PaymentRequestModel model)
    {
        ArgumentNullException.ThrowIfNull(model, nameof(model));

        var recipientName = "Demo Merchant Name";
        var amount = "100,00";
        var currency = "SEK";
        var props = new BankIdPaymentProperties(TransactionType.card, recipientName)
        {
            Money = new(amount, currency),
            UserVisibleData = "Demo of Payment with Active Login.",
            Items =
            {
                {"scheme", provider},
                {"transactionType", nameof(TransactionType.card)},
                {"recipientName", recipientName},
                {"amount", amount},
                {"currency", currency}
            },
        };

        var returnPath = $"{Url.Action(nameof(Callback))}?provider={provider}";
        return this.BankIdInitiatePayment(props, returnPath, provider);
    }

    [AllowAnonymous]
    [HttpPost]
    public async Task<IActionResult> Callback(string provider)
    {
        var result = await _bankIdPaymentService.GetPaymentResultAsync(provider);
        if (result?.Succeeded != true || result.BankIdCompletionData == null)
        {
            throw new Exception("Payment error");
        }

        return View("Result", new PaymentResultViewModel(
            result.BankIdCompletionData.User.PersonalIdentityNumber,
            result.BankIdCompletionData.User.Name,
            result.BankIdCompletionData.Device.IpAddress,
            result.Properties.Items["transactionType"] ?? string.Empty,
            result.Properties.Items["recipientName"] ?? string.Empty,
            result.Properties.Items["amount"] ?? null,
            result.Properties.Items["currency"] ?? null
            )
        );
    }
}
Basic configuration samples
Using client certificate from Azure KeyVault
services.AddBankId(bankId =>
    {
        bankId
            .UseProductionEnvironment()
            .UseClientCertificateFromAzureKeyVault(configuration.GetSection("ActiveLogin:BankId:ClientCertificate"))
            ...
    });
By default, X509KeyStorageFlags.DefaultKeySet is used when loading the client certificate from Azure Key Vault.
If this does not work in your environment, it is possible to override the X509KeyStorageFlags used when loading the certificate. This allows you to configure certificate handling in a way that is compatible with your specific hosting or security requirements.
services.AddBankId(bankId =>
    {
        bankId
            .UseProductionEnvironment()
            .UseClientCertificateFromAzureKeyVault(configuration.GetSection("ActiveLogin:BankId:ClientCertificate"), X509KeyStorageFlags.EphemeralKeySet)
            ...
    });
Using client certificate from custom source
services.AddBankId(bankId =>
    {
        bankId
            .UseProductionEnvironment()
            .UseClientCertificate(() => new X509Certificate2( ... ))
            ...
    });
Using client certificate from custom certificate service
services.AddBankId(bankId =>
    {
        bankId
            .UseProductionEnvironment()
            .UseClientCertificate(sp => sp.GetRequiredService<MyCustomCertificateService>().GetCertificate())
            ...
    });
Adding schemas
- Same device: Launches the BankID app on the same device, no need to enter any personal identity number.
- Other device: The user manually launches the app on the smartphone and scans the QR code.
services
    .AddAuthentication()
    .AddBankIdAuth(bankId =>
    {
        bankId
            .AddSameDevice()
            .AddOtherDevice();
    });
Customizing schemas
By default, Add*Device will use predefined schemas and display names, but they can be changed.
services
    .AddAuthentication()
    .AddBankIdAuth(bankId =>
    {
        bankId
            .AddSameDevice("custom-auth-scheme", "Custom display name", options => { ... })
            .AddOtherDevice(BankIdDefaults.OtherDeviceAuthenticationScheme, "Custom display name", options => { ... });
    });
Customizing BankID options
BankId options allow you to set and override some options such as the below requirements on how the authentication or signature order must be performed.
.AddOtherDevice(options =>
{
    // If the client needs to provide MRTD (Machine readable travel document) information to complete the order.
    // Only Swedish passports and national ID cards are supported.
    options.BankIdRequireMrtd = true;

    // Users are required to sign the transaction with their PIN code, even if they have biometrics activated.
    options.BankIdRequirePinCode = true;

    // Limit possible login methods to, for example, only allow BankID on smartcard.
    // If no policy is set, it will fall back to require mobile BankID for OtherDevice flow
    options.BankIdCertificatePolicies = [ BankIdCertificatePolicy.BankIdOnFile, BankIdCertificatePolicy.BankIdOnSmartCard ];

    // If set to true a risk indication is requested from BankID and returned as part of the collect response.
    options.BankIdReturnRisk = true;
});
If you want to apply some options for all BankID schemes, you can do so by using .Configure<BankIdAuthOptions>(...).
.Configure<BankIdAuthOptions>(options =>
{
    options.BankIdRequireMrtd = true;
    options.BankIdReturnRisk = true;
});
Requirements can also be set dynamically for each authentication, see section Resolve requirements on Auth request. To use dynamic requirements with signatures provide the requirements as part of the BankIdSignProperties, see section Sign.
To use dynamic requirements with payments provide the requirements as part the BankIdPaymentProperties, see section Payment.
Concepts
Storing certificates in Azure
These are only necessary if you plan to store your certificates in Azure KeyVault (recommended) and use the extension for easy integration with BankID.

- Deploy Azure KeyVault to your subscription. The ARM-template available in AzureProvisioningSample contains configuration that creates a KeyVault and enables Managed Service Identity for the App Service.
- Import the certificates to your Azure Key Vault.
- Add the following to your config, the secret identifier and auth settings.
{
    "ActiveLogin:BankId:ClientCertificate": {
        "AzureKeyVaultUri": "TODO-ADD-YOUR-VALUE",
        "AzureKeyVaultSecretName": "TODO-ADD-YOUR-VALUE"
    }
}
Certificates are secrets
When configuring the AzureKeyVaultSecretName, the name is retrieved from the Certificates rather than Secrets in the Azure Portal. It is called a secret in the API since this is how Azure Key Vault exposes certificates with private keys.
You can read more about the reasoning behind this in this blog post or in the very extensive official documentation.
KeyVault credentials
By default, the DefaultAzureCredential will be used as credentials. For info on how to use that, see Microsoft docs. The minimal configuration then looks like this:
{
    "ActiveLogin:BankId:ClientCertificate" {
        "AzureKeyVaultUri": "TODO-ADD-YOUR-VALUE",
        "AzureKeyVaultSecretName": "TODO-ADD-YOUR-VALUE"
    }
}
You can override the specific managed identity client id to use:
{
    "ActiveLogin:BankId:ClientCertificate" {
        "AzureKeyVaultUri": "TODO-ADD-YOUR-VALUE",
        "AzureKeyVaultSecretName": "TODO-ADD-YOUR-VALUE",

        "AzureManagedIdentityClientId": ""
    }
}
You can also override to use client credentials:
{
    "ActiveLogin:BankId:ClientCertificate" {
        "AzureKeyVaultUri": "TODO-ADD-YOUR-VALUE",
        "AzureKeyVaultSecretName": "TODO-ADD-YOUR-VALUE",

        "AzureAdTenantId": "",
        "AzureAdClientId": "",
        "AzureAdClientSecret": ""
    }
}
They will be evaluated in the order:
ClientSecretCredentialwithAzureAdTenantId+AzureAdClientId+AzureAdClientSecret(if specified)DefaultAzureCredentialwithAzureManagedIdentityClientId(if specified)DefaultAzureCredential
Claims Issuing
Active Login aims to issue the most relevant claims that can be extracted from the information provided by BankID. There are scenarios where you might like to change issued claims or add new ones yourself. We've made the claims issuing pipeline pluggable so you can add your own transformer.
All of the default claims behaviour are implemented in BankIdDefaultClaimsTransformer and this is the only transformer added by default.
Implementing IBankIdClaimsTransformer
You are also able to create your own transformer by inheriting it from the interface IBankIdClaimsTransformer. BankIdClaimsTransformationContext will contain the relevant context, and also the already issued list of claims that you can transform.
Once implemented, register your implementation using:
services
    .AddAuthentication()
    .AddBankIdAuth(bankId =>
    {
        bankId.AddSameDevice();
        bankId.AddClaimsTransformer<BankIdYourCustomClaimsTransformer>();
    });
The claims beeing issued by default have the names/keys specified in the public class BankIdClaimTypes so you can refer to them by these constants.
Example: Add orderref as txn claim
If the application that uses ActiveLogin BankId needs to keep an audit trail of the sign-in, the txn claim could preferably be used for this.
From OpenId Connect for Identity Assurance:
The txn Claim as defined in [RFC8417] is used in the context of this extension to build audit trails across the parties involved in an OpenID Connect transaction.
public class BankIdTxnClaimsTransformer : IBankIdClaimsTransformer
{
    public Task TransformClaims(BankIdClaimsTransformationContext context)
    {
        context.AddClaim("txn", context.BankIdOrderRef);

        return Task.CompletedTask;
    }
}
Note: If the txn claim is issued, you are responsible for making sure to keep relevant audit information given that session. See the OpenId Connect spec linked above for more information.
Example: Add birthdate and gender claims
It is possible to extract some information from the swedish personal identity number. In previous versions of Active Login this was a built in feature, but is now removed from the default set of claims beeing issued. If you still are interested in such functionality, you can easily implement the functionality using the code below.
See information on the limitations of hint information in the ActiveLogin.Identity readme.
public class BankIdPinHintClaimsTransformer : IBankIdClaimsTransformer
{
    private const string GenderJwtType = "gender";
    private const string BirthdateJwtType = "birthdate";

    public Task TransformClaims(BankIdClaimsTransformationContext context)
    {
        var personalIdentityNumber = PersonalIdentityNumber.Parse(context.PersonalIdentityNumber);

        // Add gender from gender hint
        // See https://github.com/ActiveLogin/ActiveLogin.Identity#hints for limitations
        var jwtGender = GetJwtGender(personalIdentityNumber.GetGenderHint());
        if (!string.IsNullOrEmpty(jwtGender))
        {
            context.AddClaim(GenderJwtType, jwtGender);
        }

        // Add birthdate from birthdate hint
        // See https://github.com/ActiveLogin/ActiveLogin.Identity#hints for limitations
        var jwtBirthdate = GetJwtBirthdate(personalIdentityNumber.GetDateOfBirthHint());
        context.AddClaim(BirthdateJwtType, jwtBirthdate);

        return Task.CompletedTask;
    }

    private static string GetJwtGender(Gender gender)
    {
        // Specified in: http://openid.net/specs/openid-connect-core-1_0.html#rfc.section.5.1
        return gender switch
        {
            Gender.Female => "female",
            Gender.Male => "male",

            _ => string.Empty,
        };
    }

    private static string GetJwtBirthdate(DateTime birthdate)
    {
        // Specified in: http://openid.net/specs/openid-connect-core-1_0.html#rfc.section.5.1
        return birthdate.Date.ToString("yyyy-MM-dd");
    }
}
Return URL for cancellation
If a user cancels the login, the user will be redirected to the cancelReturnUrl.
The defaults for cancellation are as follows:
- Same Device Scheme returns to scheme selection
- Other Device Scheme returns to scheme selection when using QR codes
It is possible to override the default navigation when cancelling an authentication request. The URL used for navigation is set through the cancelReturnUrl item in the AuthenticationProperties passed in the authentication challenge.
var props = new AuthenticationProperties
{
    RedirectUri = Url.Action(nameof(ExternalLoginCallback)),
    Items =
    {
        { "returnUrl", "~/" },
        { "cancelReturnUrl", "~/some-custom-cancellation-url" },
        { "scheme", provider }
    }
};

return Challenge(props, provider);
Handle missing or invalid state cookie
If the user navigates directly to the BankID status page (/ActiveLogin/BankId/Auth) the state cookie (__ActiveLogin.BankIdState) will be missing. If that happens, the flow will fail. By default, the user will be redirected back to the cancelReturnUrl, see Setting the return URL for cancellation.
This behaviour can be overridden by implementing IBankIdInvalidStateHandler and adding that to the IOC-container.
A simple sample of such handler is:
public class SampleInvalidStateHandler : IBankIdInvalidStateHandler
{
    public Task HandleAsync(HttpContext httpContext, BankIdInvalidStateContext invalidStateContext)
    {
        httpContext.Response.StatusCode = StatusCodes.Status500InternalServerError;

        return Task.CompletedTask;
    }
}
Multi tenant scenario
With the current architecture of Active Login all services are registered "globally" and you can't call .AddBankId() more than once.
To run Active Login in a multi tenant scenario, where different customers should use different certificates, you could register multiple certificates and at runtime select the correct one per request. To register multiple certificates you need to use the .AddClientCertificate...() instead of .UseClientCertificate...() as the .Use...() version will overwrite any existing certificates registered with the http client handler.
With our current solution, this requires you to disable pooling of the SocketsHttpHandler so we've decided not to ship that code in the NuGet-package, but below you'll find a sample on how it could be configured. We hope to redesign this in the future.
Note: The code below is a sample and because it disables PooledConnection it might (and will) have performance implications.
internal static class BankIdBuilderExtensions
{
    public static IBankIdBuilder UseClientCertificateResolver(this IBankIdBuilder builder, Func<ServiceProvider, X509CertificateCollection, string, X509Certificate> configureClientCertificateResolver)
    {
        builder.ConfigureHttpClientHandler((serviceProvider, httpClientHandler) =>
        {
            httpClientHandler.PooledConnectionLifetime = TimeSpan.Zero;
            httpClientHandler.SslOptions.LocalCertificateSelectionCallback =
                (sender, host, certificates, certificate, issuers) => configureClientCertificateResolver(serviceProvider, certificates, host);
        });

        return builder;
    }
}

public class Startup
{
    public void ConfigureServices(IServiceCollection services)
    {
        // ...
        services
            .AddBankId(bankId =>
            {
                bankId
                    .AddClientCertificateFromAzureKeyVault(configuration.GetSection("ActiveLogin:BankId:ClientCertificate1"))
                    .AddClientCertificateFromAzureKeyVault(configuration.GetSection("ActiveLogin:BankId:ClientCertificate2"))
                    .AddClientCertificateFromAzureKeyVault(configuration.GetSection("ActiveLogin:BankId:ClientCertificate3"))
                    .UseClientCertificateResolver((serviceCollection, certificates, hostname) =>
                    {
                        // Apply logic here to select the correct certificate
                        return certificates[0];
                    });

                // ...
            }
    }
}
Customize the UI
Active Login comes with predefined views that you can use, but maybe you'd rather use your own views to customize layout or behavior.
The UI is bundled into the package as a Razor Class Library, a technique that allows you to override the parts you want to customize. The Views and Controllers that can be customized can be found in the GitHub repo.
To override the default UI your web project, create the following folder:
Areas/ActiveLogin/Views/Shared
In this folder, you can then create any of the partials and MVC will then discover your partials and use any of them before ours. It's still possible to call our partials if you still want to use them.
Init.cshtml_Wrapper.cshtml_Form.cshtml_Status.cshtml_Script.cshtml_Style.cshtml_Spinner.cshtml
If you want, you can override the UI for Auth, Sign and Payment with different templates. Do so by placing the files in one of these folders:
Areas/ActiveLogin/Views/BankIdUiAuthAreas/ActiveLogin/Views/BankIdUiSignAreas/ActiveLogin/Views/BankIdUiPayment
See the MVC sample to see this in action, as demonstrated here.
Simulate BankID API errors
When developing and testing your application, it can be useful to simulate various BankID API errors to ensure your application handles them gracefully. ActiveLogin provides a way to simulate these errors in any environment.
The BankIdBuilder has an extension method AddSimulatedBankIdApiError that can be used to simulate errors.
The method takes the parameters:
errorRate: The rate of errors to simulate, a value between 0 and 1. For example, 0.5 will simulate an error in 50% of the requests.errors: The errors that will be used to simulate. The errors are defined in a Dictionary with the key being anErrorCodeEnum and the value being the ErrorDescription.varyErrorTypes: If true, the error type will be varied between the errors in the list. If false, the same random error type will be used for all API calls.
Simulated API error usage
The example below will fail 20% of the API calls to BankId with either a RequestTimeout or InternalError. The error type will be varied between the errors.
services
    .AddBankId(bankId =>
    {
        bankId.UseSimulatedEnvironment();
        bankId.AddSimulatedApiErrors(
            errorRate: 0.2,
            errors: new Dictionary<ErrorCode, string>()
            {
                { ErrorCode.RequestTimeout, "Timeout in API" },
                { ErrorCode.InternalError, "Internal error in API" }
            },
            varyErrorTypes: true);
    });
Event listeners
During the login flow, quite a lot of things are happening and using our event listeners you can listen and act on those events. By implementing and registering IBankIdEventListener you will be notified when an event occurs. A common scenario is logging. Multiple event listeners can be registered.
BankIdEvent is the base class for all events which all events will inherit from. Each event might (and in most cases will) have unique properties relevant for that specific event.
Event types
At the moment, we trigger the events listed below. They all have unique event properties relevant to the event type.
- AspNet
BankIdAspNetChallengeSuccessEventBankIdAspNetAuthenticateSuccessEventBankIdAspNetAuthenticateFailureEvent
- Initialize
BankIdInitializeSuccessEventBankIdInitializeErrorEvent
- Sign
BankIdSignSuccessEventBankIdSignFailureEvent
- Payment
BankIdPaymentSuccessEventBankIdPaymentFailureEvent
- Collect
BankIdCollectPendingEventBankIdCollectCompletedEventBankIdCollectFailureEventBankIdCollectErrorEvent
- Cancel
BankIdCancelSuccessEventBankIdCancelErrorEvent
Sample implementation
public class BankIdSampleEventListener : IBankIdEventListener
{
    public Task HandleAsync(BankIdEvent bankIdEvent)
    {
        Console.WriteLine($"{bankIdEvent.EventTypeName}: {bankIdEvent.EventSeverity}");
        return Task.CompletedTask;
    }
}
services
    .AddBankId(bankId =>
    {
        bankId.AddEventListener<BankIdSampleEventListener>();
    });
Built in event listeners
BankIdDebugEventListener
BankIdDebugEventListener will listen for all events and write them as serialized JSON to the debug log using ILogger.LogDebug(...).
Call bankId.AddDebugEventListener() to enable it. Good to have for local development to see all details about what is happening.
services
    .AddBankId(bankId =>
    {
        bankId.AddDebugEventListener();
    });
BankIdApplicationInsightsEventListener
BankIdApplicationInsightsEventListener will listen for all events and write them to Application Insights.
Call bankId.AddApplicationInsightsEventListener() to enable it. Note that you can supply options to enable logging of metadata, such as personal identity number, age and IP.
Note: This event listener is available through a separate package called ActiveLogin.Authentication.BankId.AzureMonitor.
services
    .AddBankId(bankId =>
    {
        bankId.AddApplicationInsightsEventListener();
    });
By default it will use whatever InstrumentationKey is registered with the application. There are overloads available so you can customize this:
services
    .AddBankId(bankId =>
    {
        bankId.AddApplicationInsightsEventListener("CUSTOM_CONNECTION_STRING");
    });
You can also customize what kind of data should be logged together with the Application Insight events. For example:
services
    .AddBankId(bankId =>
    {
        bankId.AddApplicationInsightsEventListener(options =>
            {
                options.LogUserPersonalIdentityNumber = false;
                options.LogUserPersonalIdentityNumberHints = true;

                options.LogUserNames = false;

                options.LogDeviceIpAddress = false;
                options.LogDeviceUniqueHardwareId = true;
                options.LogUserBankIdIssueDate = true;

                // And more...
            });
    });
BankIdLoggerEventListener
BankIdLoggerEventListener will listen for all events and write them with a descriptive text to the log using ILogger.Log(...).
This listener is registered by default on startup, se info below if you want to clear the default listeners.
Default registered event listeners
By default, two event listeners will be enabled:
BankIdLoggerEventListener(Log all events toILogger)BankIdResultStoreEventListener(Map the completion event forIBankIdResultStore, see info below under Store data on auth completion.)
If you want to remove those implementations, remove any class implementing IBankIdEventListener from the ASP.NET Core services in your Startup.cs:
services.RemoveAll(typeof(IBankIdEventListener));
Store data on auth completion
When the login flow is completed and the collect request to BankID returns data, any class implementing IBankIdResultStore registered in the DI will be called.
There is a shorthand method (AddResultStore) on the BankIdBuilder to register the implementation.
Note: IBankIdResultStore is just a shorthand for the BankIdCollectCompletedEvent as described above.
Sample implementation:
public class BankIdResultSampleLoggerStore : IBankIdResultStore
{
    private readonly EventId _eventId = new EventId(101, "StoreCollectCompletedCompletionData");
    private readonly ILogger<BankIdResultTraceLoggerStore> _logger;

    public BankIdResultSampleLoggerStore(ILogger<BankIdResultTraceLoggerStore> logger)
    {
        _logger = logger;
    }

    public Task StoreCollectCompletedCompletionData(string orderRef, CompletionData completionData)
    {
        _logger.LogTrace(_eventId, "Storing completion data for OrderRef '{OrderRef}' (UserPersonalIdentityNumber: '{UserPersonalIdentityNumber}')", orderRef, completionData.User.PersonalIdentityNumber);

        return Task.CompletedTask;
    }
}

services
    .AddBankId(bankId =>
    {
        bankId.AddResultStore<BankIdResultSampleLoggerStore>();
    });
The default implementation will log all data to the tracelog. If you want to remove that implementation, remove any class implementing IBankIdResultStore from the ASP.NET Core services in your Startup.cs:
services.RemoveAll(typeof(IBankIdResultStore));
Resolve the end user ip
In some scenarios, like running behind a proxy, you might want to resolve the end user IP yourself and override the default implementation.
Either register a class implementing IBankIdEndUserIpResolver:
services.AddTransient<IBankIdEndUserIpResolver, EndUserIpResolver>();
Resolve the end user device data (app or web)
When initiating a flow with BankID, you can include either the web parameter (for web applications) or the app parameter (for mobile apps) in the request. In Active Login, these parameters are collectively referred to as device data.
The metadata included with these parameters differs depending on the device type, but providing either one allows BankID to deliver a more accurate Risk indication.
Risk Indication provides an estimated risk level for a BankID transaction. It is a way to enhance the security of your application by, for example, requiring additional controls such as ID card validation for transactions that are assessed as high risk.
Configuring Device Data
Active Login provides a default implementation of the Device Data feature that assumes it is running from a web application. You can either customize this default implementation or create your own for other device types.
The following service interface must be implemented to use the Device Data feature:
IBankIdEndUserDeviceDataResolverFactory: Factory that provides the resolvers for the device type.IBankIdEndUserDeviceDataResolver: Resolver that provides the device data for a given device type.IBankIdEndUserDeviceDataConfiguration: Configuration that specifies the device type to use.
What is included in the requests?
| Device Type | Default Resolver Implementation | Metadata Included |
|---|---|---|
| Web | BankIdDefaultEndUserWebDeviceDataResolver |
Referring Domain, User-Agent, Device Identifier |
| App | No resolver is configured by default for mobile apps. | App Identifier, Device OS, Model, Device Identifier |
The Device Identifier, included in both the web and app parameters, must remain identical across requests.
For web applications, the Device Identifier should be unique to the user's browser and must not rely on a session cookie, it can be stored in a separate cookie or as a hash of one.
The BankIdDefaultEndUserWebDeviceDataResolver sets a protected cookie named __ActiveLogin.BankIdDeviceData containing a unique Device Identifier. This ensures that the identifier persists across sessions and requests.
For mobile apps, the Device Identifier uniquely identifies the device your client is running on. It should not be tied to a single user of the device and ideally should remain the same even if the app is reinstalled.
Note:
Cookies are protected using ASP.NET Core Data Protection. For more information about the cookies used by the package, including how they are protected and considerations for persistent key storage, see the Cookies issued section above. This is important, especially in distributed environments.
Customizing the Device Data feature
To customize the Device Data feature, use the UseDeviceData extension in the BankID client builder.
This allows you to specify the device type and any relevant metadata using resolvers.
The BankIdFlowService will automatically include the device data in the BankID request,
since it is dependent on the IBankIdEndUserDeviceDataResolverFactory service.
Configuration examples
If no configuration of the UseDeviceData has been set, the default implementation will be used.
This implementation will set the device type to BankIdEndUserDeviceType.Web and use
the BankIdDefaultEndUserDeviceDataResolverFactory to find the correct resolver for the device type.
The BankIdDefaultEndUserWebDeviceDataResolver is used to fetch the web browser information.
If no custom implementation is made the device data defaults to this:
services
    .AddBankId(bankId =>
    {
        bankId.UseDeviceData(config =>
        {
            // Set the device type for the request
            config.DeviceType = BankIdEndUserDeviceType.Web;

            // Use the default resolver factory
            config.UseResolverFactory<BankIdDefaultEndUserDeviceDataResolverFactory>();

            // Add the default resolver for Web
            config.UseDeviceResolver<BankIdDefaultEndUserWebDeviceDataResolver>();
        });
    });
Custom implementation requests initiated by a web browser:
services
    .AddBankId(bankId =>
    {
        bankId.UseDeviceData(config =>
        {
            // Set the device type for the request
            config.DeviceType = BankIdEndUserDeviceType.Web;

            // Use a custom resolver factory
            // that implements IBankIdEndUserDeviceDataResolverFactory
            config.UseResolverFactory<MyCustomResolverFactory>();

            // Add a custom resolver for the device type Web
            // that implements IBankIdEndUserDeviceDataResolver
            config.UseDeviceResolver<MyCustomWebDeviceDataResolver>();
        });
    });
Custom implementation requests initiated by a mobile app:
services
    .AddBankId(bankId =>
    {
        bankId.UseDeviceData(config =>
        {
            // Set the device type starting the request
            config.DeviceType = BankIdEndUserDeviceType.App;

            // Use the default resolver factory to find what device data resolvers to use
            config.UseResolverFactory<BankIdDefaultEndUserDeviceDataResolverFactory>();

            // Use the default data resolver for the device type app
            // On app devices (e.g. MAUI, Xamarin, etc.) we need to set the
            // device data manually at start
            config.UseDeviceResolver<IBankIdEndUserDeviceDataResolver>(_ => new BankIdAppDeviceDataResolver()
            {
                // App ID or package name
                AppIdentifier = "com.example.app",

                // Device operating system
                DeviceOs = "iOS 16.7.7",

                // Device model
                DeviceModelName = "Apple iPhone14,3",

                // Unique hardware ID
                DeviceIdentifier = "1234567890"
            });

        });
    });
The information for the BankIdAppDeviceDataResolver must be configured during application startup. You can also provide your own custom resolver implementation for mobile apps. There is no default resolver that automatically fetches device data for mobile apps because this data must be retrieved from the device hardware, which can vary between devices (iOS, Android, etc.).
More information available at:
Resolve requirements on Auth request
If you want to set the requirements on how the authentication order must be performed dynamically for each order instead of statically during startup in Program.cs, it can be done by overriding the default implementation of the IBankIdAuthRequestRequirementsResolver.
public class BankIdAuthRequestDynamicRequirementsResolver : IBankIdAuthRequestRequirementsResolver
{
    public Task<BankIdAuthRequirements> GetRequirementsAsync()
    {
        return Task.FromResult(new BankIdAuthRequirements()
        {
            RequireMrtd = true,
            RequirePinCode = true,
            RequiredPersonalIdentityNumber = new PersonalIdentityNumber(1999, 8, 7, 239, 1)
        });
    }
}
services.AddTransient<IBankIdAuthRequestRequirementsResolver, BankIdAuthRequestDynamicRequirementsResolver>();
Resolve user data on Auth request
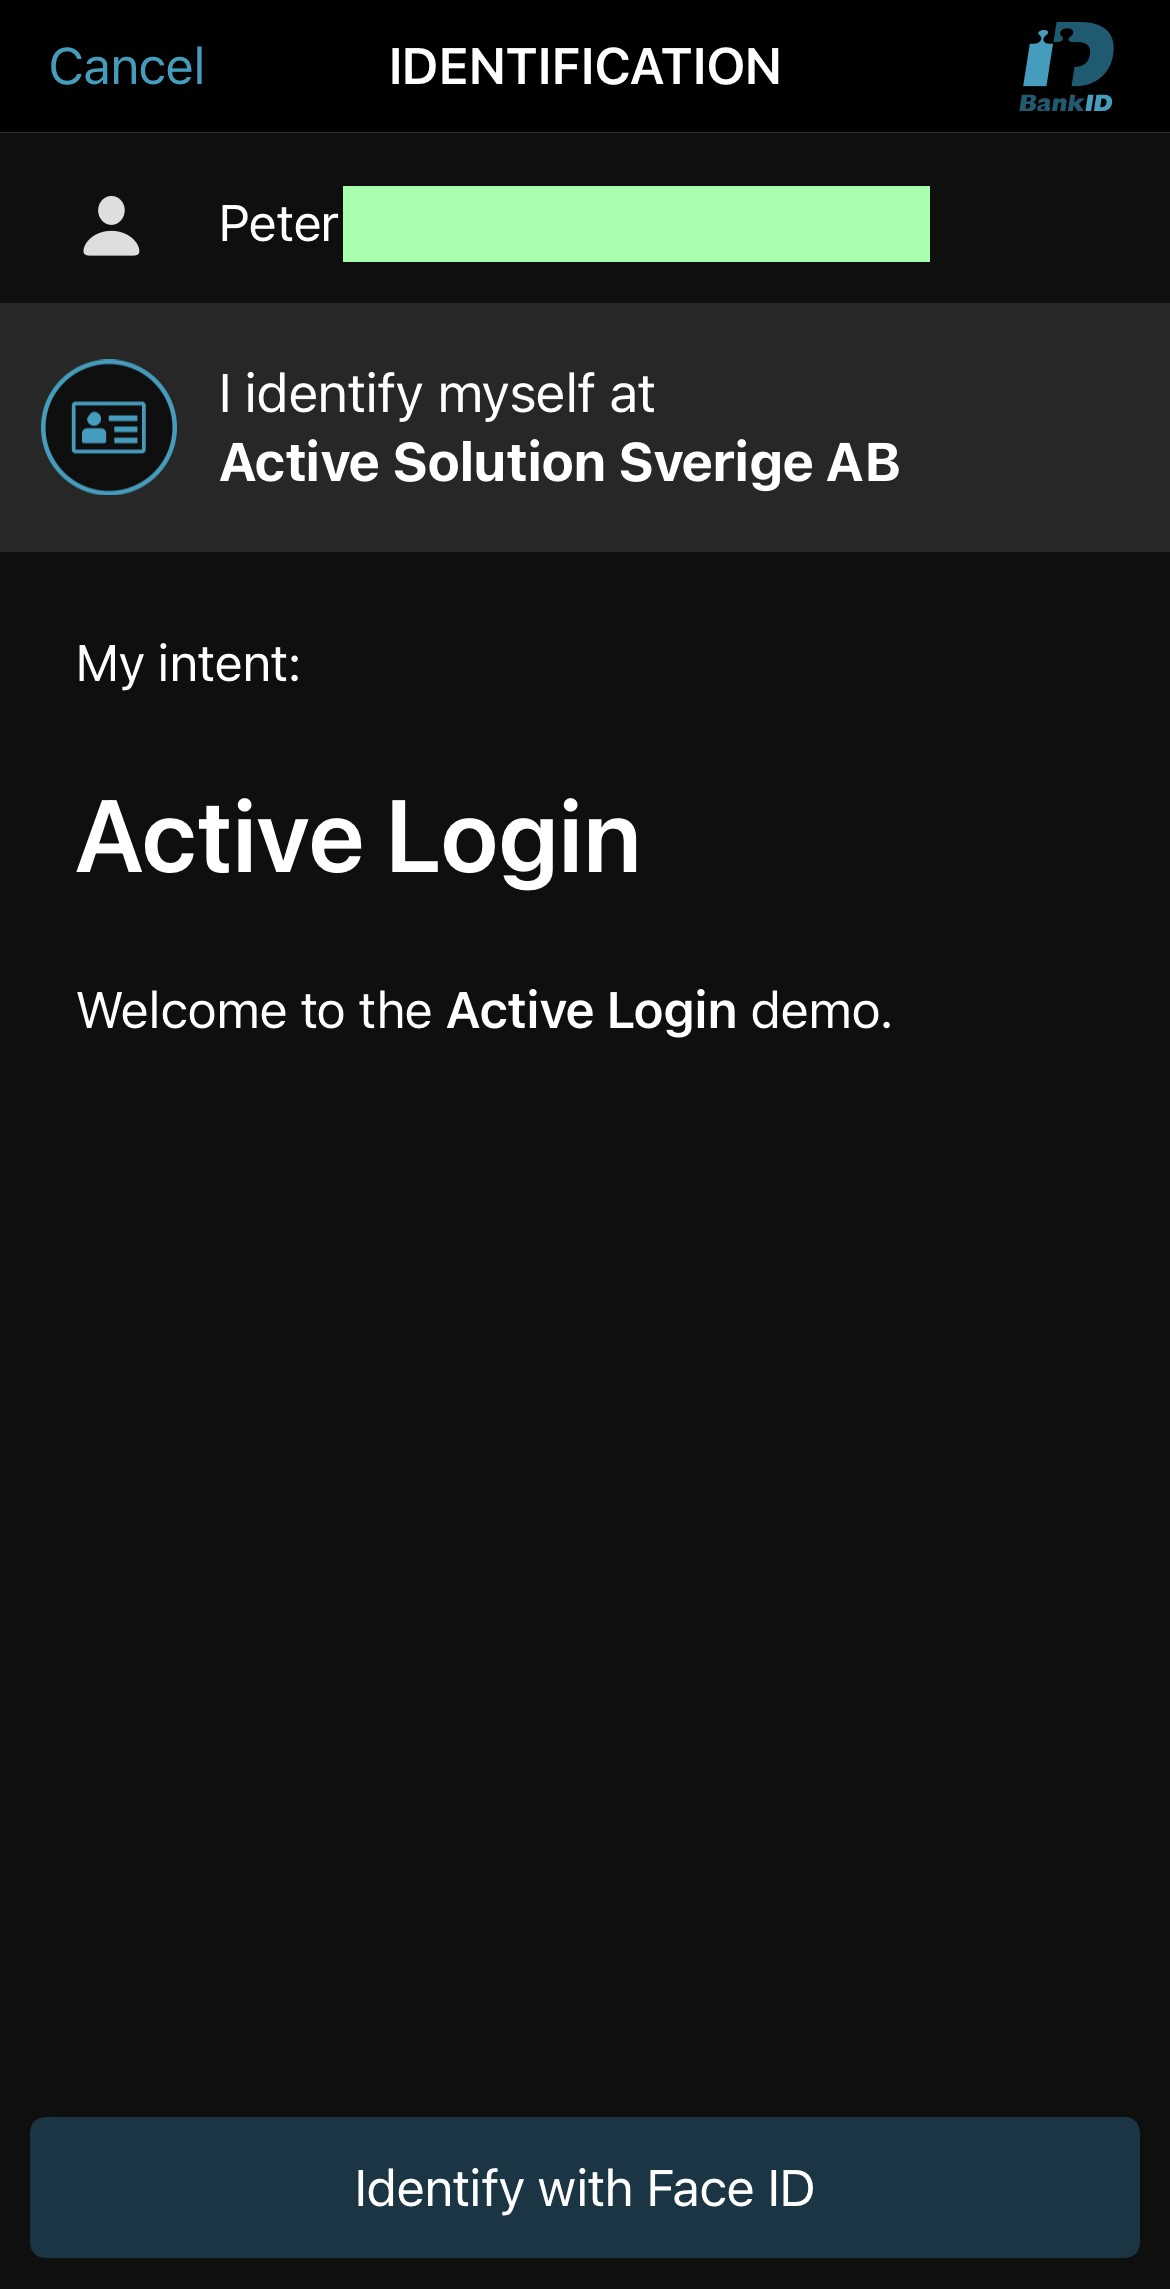
BankID allows you to display a text during authentication to describe the intent. Active Login allows you to set these parameters when authenticating:
UserVisibleDataUserNonVisibleDataUserVisibleDataFormat
These can either be set as static data during startup in Program.cs or dynamically by overriding the interface IBankIdAuthRequestUserDataResolver.
Sample of static text without formatting:
bankId.UseAuthRequestUserData(authUserData =>
{
    authUserData.UserVisibleData = "Login to your account at Active Login";
});
Sample of static text with formatting:
bankId.UseAuthRequestUserData(authUserData =>
{
    var message = new StringBuilder();
    message.AppendLine("# Active Login");
    message.AppendLine();
    message.AppendLine("Welcome to the *Active Login* demo.");

    authUserData.UserVisibleData = message.ToString();
    authUserData.UserVisibleDataFormat = BankIdUserVisibleDataFormats.SimpleMarkdownV1;
});
For more advanced scenarios, you can generate the user data dynamically by implementing IBankIdAuthRequestUserDataResolver:
public class BankIdAuthRequestDynamicUserDataResolver : IBankIdAuthRequestUserDataResolver
{
    public Task<BankIdAuthUserData> GetUserDataAsync(BankIdAuthRequestContext authRequestContext, HttpContext httpContext)
    {
        return Task.FromResult(new BankIdAuthUserData()
        {
            UserVisibleData = "*Time:* " + DateTime.Now.ToLongTimeString(),
            UserVisibleDataFormat = BankIdUserVisibleDataFormats.SimpleMarkdownV1
        });
    }
}
services.AddTransient<IBankIdAuthRequestUserDataResolver, BankIdAuthRequestDynamicUserDataResolver>();
Note: For sign, user data is mandatory, and therefore part of the initiate flow.
Custom QR code generation
By default the ActiveLogin.Authentication.BankId.QRCoder package is needed to generate QR codes using the UseQrCoderQrCodeGenerator extension method.
If you wish to provide your own implementation of QR code generation simply implement the IBankIdQrCodeGenerator interface and add your implementation as a service.
services.AddTransient<IBankIdQrCodeGenerator, CustomQrCodeGenerator>();
Custom browser detection and launch info
The functionality provided tries to detect the device by looking at the user agent. We need to know what device is used to launch the BankId app and this differs from iOS/Android/PC/Mac.
By implementing IBankIdLauncher you can customize exactly how to launch the app. It is very rare that you need to change this, but could be relevant if you use Active Login for authenticating a user in a native mobile app.
services.AddTransient<IBankIdLauncher, CustomBankIdLauncher>();
By implementing IBankIdSupportedDeviceDetector you can override how the client device is detected. This info will be used by the default BankIdLauncher.
services.AddTransient<IBankIdSupportedDeviceDetector, CustomBankIdSupportedDeviceDetector>();
Use UAParserDeviceDetector for device and browser detection
In Active Login device and browser detection is required for example to determine which URL to use to launch the BankID app, according to the BankID Relying party Guidelines. This logic is primarily encapsulated into IBankIdSupportedDeviceDetector.
The default implementation provided in ActiveLogin.Authentication.BankId.AspNetCore is limited to supporting the ~top 5 most common browsers on both iOS and Android. But since an incorrect browser detection can lead to an incorrect launch URL and result in a broken user flow, UAParserDeviceDetector in the ActiveLogin.Authentication.BankId.UAParser package should be used to support additional browsers. It has a dependency on package uap-csharp for improved user agent parsing.
Shorthand for only overriding config for custom browsers
If you want to support your custom app, or a third party app (like the built in browsers in Instagram, Facebook etc.) we've made it simple to support those scenarios by allowing you to specify a custom browser config.
The most common scenario is that you will set the schema for the app as return URL if you detect a specific User Agent.
The AddCustomBrowserByUserAgent extension method is a shorthand for adding a custom browser config for a specific user agent that overrides the return url regardless of device.
In the sample below we add support for Instagram and Facebook:
services
    .AddBankId(bankId =>
    {
        // ...

        bankId.AddCustomBrowserByUserAgent(userAgent => userAgent.Contains("Instagram"), "instagram://");
        bankId.AddCustomBrowserByUserAgent(userAgent => userAgent.Contains("FBAN") || userAgent.Contains("FBAV"), "fb://");

        // ...
    });
If you need, you can also specify the reload behaviour on the custom browser:
services
    .AddBankId(bankId =>
    {
        // ...

        bankId.AddCustomBrowserByUserAgent(userAgent => userAgent.Contains("Instagram"), new BankIdLauncherUserAgentCustomBrowser("instagram://", BrowserReloadBehaviourOnReturnFromBankIdApp.Never));

        // ...
    });
If you need to do something custom, you can implement IBankIdLauncherCustomBrowser:
services
    .AddBankId(bankId =>
    {
        // ...

        bankId.AddCustomBrowser<BankIdFacebookAppBrowserConfig>();

        // ...
    });
public class BankIdFacebookAppBrowserConfig : IBankIdLauncherCustomAppCallback
{
    private readonly IHttpContextAccessor _httpContextAccessor;

    public BankIdFacebookAppCallback(IHttpContextAccessor httpContextAccessor)
    {
        _httpContextAccessor = httpContextAccessor;
    }

    public Task<bool> IsApplicable(BankIdLauncherCustomAppCallbackContext context)
    {
        var userAgent = _httpContextAccessor.HttpContext?.Request.Headers.UserAgent.FirstOrDefault();
        if (string.IsNullOrWhiteSpace(userAgent))
        {
            return Task.FromResult(false);
        }

        var isFacebook = userAgent.Contains("FBAN") || userAgent.Contains("FBAV");
        return Task.FromResult(isFacebook);
    }

    public Task<string> GetCustomAppReturnUrl(BankIdLauncherCustomAppCallbackContext context)
    {
        return Task.FromResult(
            new BankIdLauncherCustomAppCallbackResult("fb://", BrowserReloadBehaviourOnReturnFromBankIdApp.Never, BrowserMightRequireUserInteractionToLaunch.Default)
        );
    }
}
Risk indication
You can choose to request a risk indication from BankID for both identifications and signatures. It can be used to increase security, protect your customers and reduce the risk of fraud. The indication is categorized as low, medium or high risk. You must implement your own logic to act on the assessed risk level from BankID.
You need to provide information to BankID in the auth or sign request, to help them make the risk assessment e.g. the end user’s IP address and the app or web property (which is part of Device Data in Active Login).
Incorrect information in the call gives an incorrect risk indication.
Use the BankID option below to turn on risk indication. Read more about Customizing BankID options.
    services.Configure<BankIdAuthOptions>(options =>
    {
        options.BankIdReturnRisk = true;
    });
To get risk indication extracted from the completion data returned by BankID and issued as a claim from Active Login create your own claims transformer.
public class BankIdTxnClaimsTransformer : IBankIdClaimsTransformer
{
    public Task TransformClaims(BankIdClaimsTransformationContext context)
    {
        if (context.BankIdCompletionData != null && context.BankIdCompletionData.Risk != null)
            context.AddClaim("user_risk", context.BankIdCompletionData.Risk);

        return Task.CompletedTask;
    }
}
More information available at:
Verify digital ID card
To use the API for "Verify digital ID card" you first need to register the BankID services, select an environment etc.
services
    .AddBankId(bankId =>
    {
        bankId
            .AddDebugEventListener()
            .UseTestEnvironment();
    });
Then you can use the Verify API from, for example, an MVC Controller. The API allows you to send in the content of the QR-code and responds with the verification details.
In the example below the client (HTML/JS for example) has already decoded the QR-code.
public class VerifyRequestModel
{
    public string QrCodeContent { get; set; } = string.Empty;
}

public class VerifyController : Controller
{
    private readonly IBankIdVerifyApiClient _bankIdVerifyApiClient;

    public VerifyController(IBankIdVerifyApiClient bankIdVerifyApiClient)
    {
        _bankIdVerifyApiClient = bankIdVerifyApiClient;
    }

    [HttpPost("/verify/api")]
    public async Task<ActionResult<string>> Verify([FromBody] VerifyRequestModel model)
    {
        // Minimalistic sample implementation

        ArgumentNullException.ThrowIfNull(model, nameof(model));
        if (string.IsNullOrEmpty(model.QrCodeContent))
        {
            throw new ArgumentNullException(nameof(model.QrCodeContent));
        }

        var verifyResult = await _bankIdVerifyApiClient.VerifyAsync(model.QrCodeContent);
        return verifyResult.User.PersonalIdentityNumber;
    }
}
Use api wrapper only
We have separated the API-wrapper for BankID into a separate package so that you can use it in other scenarios we have not covered. They look like this and are both well documented using XML-comments.
The constructor for these ApiClients takes an HttpClient and you need to configure that HttpClient with a BaseAddress, Tls12, client certificates etc. depending on your needs.
For easy use the APIs you register the BankID services, select an environment etc. and then the APIs are ready to be injected using IoC.
services
    .AddBankId(bankId =>
    {
        bankId
            .AddDebugEventListener()
            .UseTestEnvironment();
    });
Note: The BankIdApiClient class below is available in the ActiveLogin.Authentication.BankId.Api package.
App API:
public class BankIdAppApiClient : IBankIdAppApiClient
{
    public Task<AuthResponse> AuthAsync(AuthRequest request) { ... }
    public Task<SignResponse> SignAsync(SignRequest request) { ... }
    public Task<PaymentResponse> PaymentAsync(PaymentRequest request) { ... }
    public Task<PhoneAuthResponse> PhoneAuthAsync(PhoneAuthRequest request) { ... }
    public Task<PhoneSignResponse> PhoneSignAsync(PhoneSignRequest request) { ... }
    public Task<CollectResponse> CollectAsync(CollectRequest request) { ... }
    public Task<CancelResponse> CancelAsync(CancelRequest request) { ... }
}
Verify API:
public class BankIdVerifyApiClient : IBankIdVerifyApiClient
{
    public Task<VerifyResponse> VerifyAsync(VerifyRequest request) { ... }
}
Localization
The messages are already localized to English and Swedish using the official recommended texts. To select which language that is used you can for example use the localization middleware in ASP.NET Core.
The user messages that will be displayed are provided through the implementation of IBankIdUserMessageLocalizer, so by overriding this you can customize the messages.
services.AddTransient<IBankIdUserMessageLocalizer, CustomBankIdUserMessageLocalizer>();
Names of the person might be capitalized
The names come from the bank that the end user has, and some banks (due to legacy) stores all of the names in all caps (like ALICE SMITH).
We have chosen not to normalize the capitalization of the names as it is hard or impossible to do so in a general way.
Cookies issued
The *.AspNetCore package will issue cookies to make the auth, sign and payment flow work.
Cookie:
__ActiveLogin.BankIdUiState- This cookie is there to store state during the auth process, as the user will/might be redirected during the flow. The cookie is session based only and will be deleted once the auth, sign or payment process is finished and/or when the user closes the browser.
- A more technical deep dive of this cookie can be found in this issue.
Cookie:
__ActiveLogin.BankIdUiOptions- This cookie temporarily stores information about your configured requirements for Auth, Sign, and Payment requests. The data is retained only for the duration of an ongoing BankID transaction (i.e., Auth, Sign, or Payment). The cookie is session-based and is automatically deleted once the transaction is completed or when the user closes the browser.
Cookie:
__ActiveLogin.BankIdDeviceData- This cookie is used to store the device data for the user and to ensure that the device data is persistent across requests.
Note:
Because __ActiveLogin.BankIdUiState and __ActiveLogin.BankIdUiOptions are strictly related to temp storage during auth, sign and payment, you should not have to inform the user about these specific cookies (according to the EU "cookie law"). With the current implementation (following the convention from Microsoft ASP.NET) the usage of cookies is not optional.
Note:
All cookies issued by this package are protected using ASP.NET Core Data Protection. This means their contents are encrypted and tamper-proof.
In certain environments (such as multi-instance deployments or containers) you may need to configure Data Protection to use a persistent key store (e.g., a shared file system, Azure Blob Storage, Redis, or SQL Server) so that cookies can be unprotected across app restarts or multiple instances.
For guidance on configuring a persistent key store, see the official documentation: Data Protection configuration overview.
Browser support
We aim at supporting the latest version of all major browsers both on desktop and on mobile.
All browsers on mobile are supported to show the UI, but the redirect flow has been tested and verified on these:
- iOS
- Safari
- Chrome
- Edge
- Firefox
- Opera Touch
- Android
- Chrome
- Firefox
- Edge
- Samsung Internet
- Opera Mini
Note: Brave on iOS/Android identifies as Safari or Chrome for privacy reasons and will get wrong configuration, so the redirect flow will fail.
Note: If you aim to support IE11 a polyfill for some JavaScript features we are using is needed.